Your go-to resource for expert insights and carefully curated professional advice. Plan your renovation with confidence and ease
Apartment Electrical Renovation: Safely and Smartly
02.05.2025, 15:31 GMT Views: 866 Likes: 52
How to Redesign Your Apartment's Electrical System Like a Pro.

When embarking on a home renovation, the excitement of choosing paint colors and furniture often overshadows one crucial aspect — electrical planning. Yet, without a well-thought-out electrical layout, even the most beautifully designed interiors can quickly become inconvenient and dysfunctional.
Moreover, modern electrical planning today goes beyond just placing traditional outlets and switches. It now includes preparing for smart home systems, underfloor heating, air conditioning, and more.
In this article, we’ll offer valuable advice for designing your own electrical system, whether you're a novice or experienced in design. You’ll also learn how Remplanner software, a versatile tool beloved by both beginners and professional designers, can make the process simpler, more intuitive, and efficient, helping you create a well-coordinated, conflict-free and functional electrical plan.
Step One: Start with the Big Picture
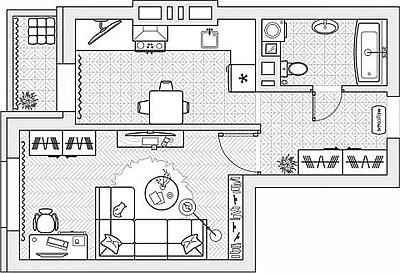
Before you even think about where outlets and switches should go, take a step back and look at your floor plan. Imagine how each room will function. Where will the major furniture pieces be placed? Where will you need task lighting, like for reading or cooking? Will you have a home office space that demands extra outlets?
It’s vital to finalize your furniture arrangement first — or at least have a clear concept — because your electrical needs follow your lifestyle. There's little point in installing outlets where they’ll be hidden behind heavy wardrobes or unreachable under counters.
Fortunately, you don't have to do this manually — in Remplanner, you can easily experiment with layouts in the Floor Plan and Furniture Planning sections. This allows you to visualize room functionality clearly and ensures that your future electrical plan is aligned perfectly with your living space. Plus, if you’re planning underfloor heating or air conditioning, you can account for their zones simultaneously, ensuring full compatibility across all systems.
Once you have a clear vision horizontally, it’s time to look upward — because vertical planning is just as critical.
Step Two: Think Vertically, Too
When planning electrical layouts, it’s easy to focus only on the horizontal plane — walls, floors, furniture placement — but thinking vertically is just as important. Ceiling height, wall structures, and even the positioning of plumbing can dramatically affect your lighting and wiring decisions.
Start with the ceilings. Measure and note the height of each room. Higher ceilings often call for layered lighting strategies to ensure the space feels balanced and functional. A single overhead light fixture may leave tall rooms feeling cavernous or dim. Instead, combine several types of lighting:
- General lighting for overall brightness (such as chandeliers or ceiling-mounted fixtures)
- Accent lighting to highlight architectural features, artwork, or create cozy zones
- Task lighting placed exactly where precision is needed — like kitchen countertops, desks, or bathroom mirrors
For rooms with lower ceilings, opt for recessed lighting or low-profile fixtures to maintain a sense of openness.
Next, assess how renovation work will alter your walls and surfaces. Adding new partitions, removing barriers, or installing plumbing and HVAC systems can significantly change the available routes for wiring.
- New partitions will likely need integrated outlets and switches — plan their positions early.
- Demolished walls may require rerouting existing wiring — consider how circuits need to adapt.
- Plumbing installations could block traditional cable paths — you’ll need to route electrical wiring around them safely.
Again, Remplanner proves invaluable: it dynamically updates optimal wiring paths and alerts you to potential issues as you redesign walls, ceilings, and engineering systems. It also automatically coordinates all smart home, heating, and cooling components in one place — eliminating costly conflicts between systems.
By considering vertical aspects early, you build a plan that’s not just functional, but also safe, efficient, and beautiful.
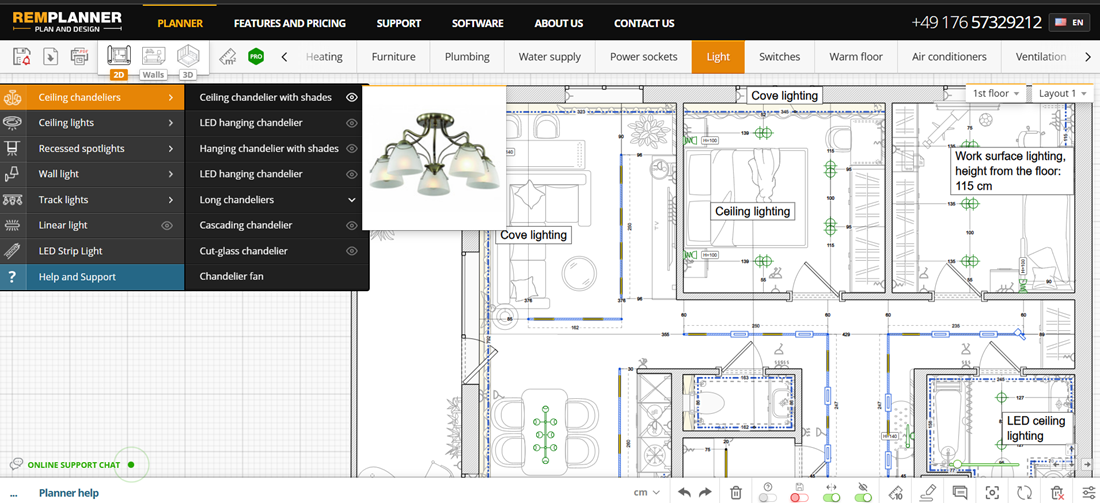
Step Three: Map Out the Essentials
With your floor plan and vertical adjustments settled, you can start placing the actual components — sockets, switches, lights, and now also wire-outs.
Sockets: Modern homes demand far more outlets than you might expect — for TVs, chargers, kitchen appliances, smart hubs, and more. Distribute them thoughtfully along walls where furniture will sit.
- Switches: Plan for convenience. Ideally, light switches should be accessible near every entrance to a room. For larger spaces, consider two-way switches.
- Lighting: Kitchens and bathrooms require bright, functional lighting; living rooms and bedrooms benefit from layered, adjustable solutions.
- Wire-outs: In Remplanner, besides sockets, you can add wire-outs directly onto the drawing. These are points where electrical or low-voltage cables exit the wall for direct connection to a device (without using a socket) — perfect for wall lights, embedded lighting, built-in appliances, or equipment like air conditioners and ovens.
One common beginner mistake is underestimating socket needs or clustering all outlets in one corner. A well-placed outlet today saves frustration — and ugly extension cords — tomorrow.
At the same time, start selecting the right equipment for your system. Define how many circuit breakers and RCDs (residual current devices) you’ll need for safe, reliable operation. Choose cables appropriate for the expected load: typically, 2.5 mm² for general sockets, 1.5 mm² for lighting circuits, and at least 4 mm² for high-power appliances like stoves. Careful planning at this stage ensures your system will be both safe and future-proof.
Step Four: Ensure Power Capacity Matches Your Needs
Check how many kilowatts are allocated for your apartment. If you need more, inquire with the company servicing and managing your building whether this is possible, and fill out an application for an increase in advance.
Step Five: Use the Right Tools
Planning an electrical system manually can be overwhelming — but it doesn’t have to be. Innovative CAD software like Remplanner makes the process intuitive, even for first-timers.
You simply set up furniture, walls, and utilities, and Remplanner suggests optimal electrical layouts. It also proposes logical placements for sockets, switches, lights, smart home sensors, heating systems, and more — all coordinated in a single, unified project.
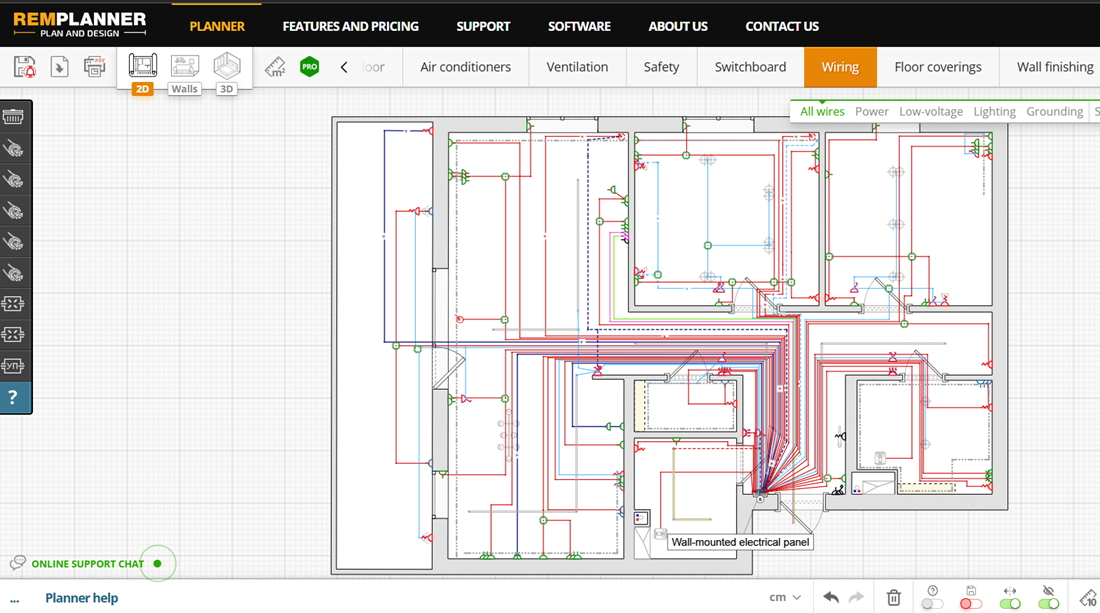
Look at this drawing. It looks complicated, doesn’t it? But it was created by our client, a homeowner who isn’t a designer or an electrician. In fact, this drawing was automatically generated by the Remplanner software. She simply specified all the electrical requirements for the house, including the placement of outlets, appliances, and more — and the drawing was automatically created. Remplanner provides simple solutions for complex tasks.
Whether you're a homeowner, a designer optimizing workflow, or a contractor needing professional documentation, Remplanner equips you to work smarter and faster.
Step Six: Think About Communication
A well-prepared electrical plan isn’t just for you — it’s a communication tool for contractors, electricians, smart home installers, and inspectors. Clear, standardized plans ensure everyone on your team is aligned, minimizing costly misunderstandings and rework.
Before proceeding, it’s a good idea to consult an electrician. A qualified professional can review your plan and offer valuable advice. This consultation is much easier to conduct when you have clear technical drawings on hand — and Remplanner makes that possible.
Remplanner simplifies this: export professional-grade layouts with a few clicks. All technical documents are compliant with industry norms, bridging the gap between amateur planning and professional execution.
By prioritizing communication early, you keep your renovation smooth, efficient, and stress-free.
Final Thoughts
Planning your home’s electrical system might seem daunting at first, but with a thoughtful approach — and the right technology — it becomes not just manageable, but genuinely rewarding.
Start by envisioning your daily life within the space, define your furniture and room structure, and let the electrical plan naturally grow around your lifestyle needs — including future-proofing for smart home technologies.
By relying on innovative tools like Remplanner, you transform what could be a complicated technical task into a clear, efficient, and even creative part of your renovation journey.
After all, a beautiful home isn’t just about what you see — it’s about how effortlessly it supports your everyday life.
 Antonella
Marconi