 en
en ua
ua id
id cs
cs de
de es
es fr
fr hu
hu it
it nl
nl pl
pl pt
pt ro
ro sv
sv tr
trStep-by-step tutorial about creating drawings
Step 1. Software interface
Creating competent drawings requires a large number of tools, which are grouped according to their purpose in our software.
Toolbar Here you choose,
which tool
to draw. Each sheet has
its own set of tools.
to draw. Each sheet has
its own set of tools.
Plan sheet bar
Each sheet corresponds to a specific stage of the project.
Fill in the sheets sequentially one by one.
Fill in the sheets sequentially one by one.
Additional modules and modes
All auxiliary functions and
modules for printing, processing and analyzing drawings are collected here.
modules for printing, processing and analyzing drawings are collected here.
Customization of appearance and additions
Here you can customize the appearance of drawings
and use additional tools.
and use additional tools.
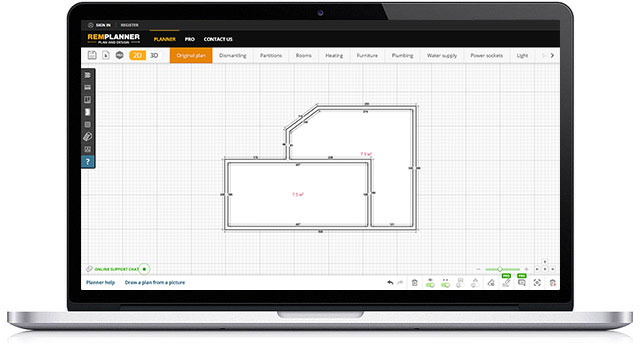
Moving and scaling
 To move the drawing field,
hold down the left mouse button anywhere
and move the cursor aside.
 You can change the scale of drawings (zoom in
and zoom out) using the mouse wheel or the slider in the lower right corner.
 Use the keyboard arrows to move wall nodes, furniture and other items in the desired direction.
 The Escape key on the keyboard allows you to
quickly cancel the active tool or hide the context menu.
Step 2. Wall drawing

2.1.
Start drawing with the walls. This is the first tool on the panel of the initial plan.
Start drawing the first wall anywhere on the drawing area. Click and hold the left mouse button on the
starting point of the wall. Then, without releasing the mouse button, move the cursor to the desired distance in the desired direction
to the endpoint of the wall and release the mouse button - at this moment the wall will be fixed on the drawings.
2.2.
2.3.
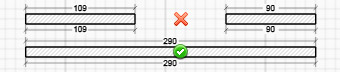
Try to draw the walls clockwise in one direction. Make sure adjacent walls are connected to
each other. The red colour of the drawing circle will tell you about this - it means that you connect two walls together.
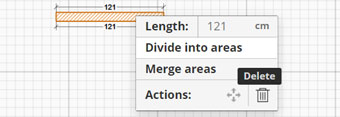
To perform any actions with already drawn walls, you need to right-click on any of them.
In the context menu, you find all available actions for the selected wall, including deleting and resizing.
In the context menu, you find all available actions for the selected wall, including deleting and resizing.
2.4.

2.5.
If you select a wall with a short left mouse click, then the mode of moving this wall and its nodes is activated.
Drag the circles (nodes) of the wall endings that appear or the entire wall (the circle in the middle of the wall). Hold down
the left mouse button and release it when the move action is complete.
2.6.
Step 3. Display settings

In the lower right corner, there is available a set of additional options to customize the display and drawing.
Step 4. Door and window openings

4.1.
After you have drawn the walls, arrange window and door openings on top of them.
Note! It is necessary to install all openings exactly ON TOP of the walls, leaving no empty areas between the walls.
4.2.
Step 5. Arrangement of furniture and plumbing
5.1.
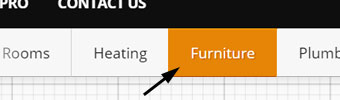
To get started, you need to go to the furniture sheet in the general list and select the appropriate item in the toolbar.
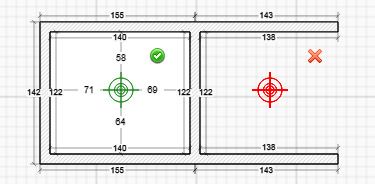
Note! Furniture, plumbing and other elements on the planning sheets are installed ONLY inside the rooms
and enclosed spaces on the drawings. You cannot place an item on an empty drawing field.
5.2.
5.3.
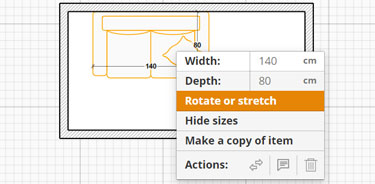
To move an already installed item, you can “drag” it with the left mouse button.
To rotate, delete, change the size or parameters of an item, open the context menu by right-clicking on this item and
select the required action.
5.4.
Have questions or difficulties?
Write a message to technical support