Your go-to resource for expert insights and carefully curated professional advice. Plan your renovation with confidence and ease
How to Measure Your Apartment for a Successful Renovation
30.05.2025, 15:37 GMT Views: 1205 Likes: 35
A complete guide to accurately measuring your apartment for renovation planning — plus a detailed list of essential tools you'll need.

Renovating an apartment is an exciting journey — a chance to create a space that truly reflects your style and needs. But before diving into design choices or picking out finishes, there’s one essential step you can’t skip: accurately measuring your entire apartment. Precise measurements form the foundation for any renovation project, ensuring your plans fit perfectly and avoiding costly mistakes down the line. Plus, well-executed measurements will bring clarity to your renovation vision — and if you’ve been feeling overwhelmed, they’ll help you regain control and confidence. Here’s a comprehensive guide on how to measure your apartment effectively, what tools you need, and common pitfalls to avoid.
Why Accurate Measurements Matter
Imagine ordering custom cabinets that don’t fit, or purchasing flooring that falls short by several centimeters. In renovation projects, even small inaccuracies can snowball into big problems — delays, extra costs, and frustration. Accurate measurements help architects, designers, and contractors create precise plans, and allow you to visualize the space realistically. This step also ensures all new installations — from walls and windows to electrical outlets — align seamlessly with your vision.
Preparing for the Measurement Process
Before you start measuring, prepare the space. Clear the rooms of bulky furniture or personal items that may obstruct access to walls and corners Make sure you have all the necessary tools on hand — a complete list of essential renovation measuring tools is provided at the end of this article. If you have a blueprint or floor plan of your apartment, bring it along — it will be useful for comparing your measurements later.
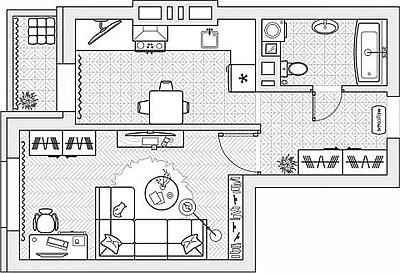
Step 1: Start with a Sketch Plan
Create a simple sketch of your apartment layout, labeling each room. Later, you’ll use it to note all measurements and key features. Visual documentation helps you and your contractors understand the space and avoid confusion. Photograph complicated or unusual spots to capture details you might forget.
If you're working on paper, that’s already a great start — better than no plan at all. But why stop there, when tools like Remplanner make the process so much smoother? In this digital platform, you can recreate your floor plan with precision. If any of your measurements turn out to be incorrect or change later, the drawing updates automatically — no need to redraw everything by hand. Paper sketches can quickly become messy and hard to read, even for experienced designers. That’s because a proper measurement plan contains a lot of layered information, and it’s easy to get overwhelmed.
Digital tools like Remplanner help bring clarity to this complexity. They not only allow you to organize your layout neatly but also lay the groundwork for future steps. Once your base plan is complete, you can use it to generate other key drawings — such as furniture layouts, electrical and lighting plans, and more.

And the best part? Remplanner is fully online, so you can access your project and make updates from any device (even from a smartphone! - in a preview mode), anywhere — whether you're at home, at the hardware store, or on-site with a contractor. That kind of flexibility can make all the difference during a renovation.
Step 2: Measure the Walls and Room Dimensions
Start by measuring the length and width of each room, corner to corner. For rooms with irregular shapes, break the measurements into smaller sections. If there are alcoves, columns, or angled walls, note their positions and dimensions separately.
Don’t overlook ceiling heights: measure at multiple points, including all four corners and the center of the room. Ceilings in older buildings or those with structural variations may not be perfectly level, and knowing these differences early can influence your decisions about lighting fixtures, cabinetry, and moldings.
If your renovation plan includes moving walls, adding insulation, or soundproofing, also record the thickness of the walls. This measurement is important for understanding how much usable space you actually have, and it’s critical when considering structural changes or installing features like built-in shelves or recessed lighting.
Remember, these dimensions form the framework for your entire renovation — accurate measurements here save you time, money, and frustration down the line
Step 3: Record Door and Window Sizes
Measure the width and height of every door and window. Then, note the distance from each to the nearest corners of the wall. This tells you exactly where each opening sits in the space.
Add details like the height of window sills, the swing direction of doors, and any surrounding elements such as radiators or decorative frames. These affect your options for furniture placement, curtain length, and the installation of built-ins — and are easy to overlook without a proper plan.
Step 4: Map Out Electrical and Plumbing Features
Walk through each room and mark the location of outlets, switches, and lighting fixtures. Record how far each one is from the floor and nearby walls. Include thermostats, network ports, and any smart features or intercoms.
In the kitchen, bathroom, and laundry area, make note of all plumbing connections — including sinks, drains, and shut-off valves. Measure their location relative to surrounding surfaces. Also mark any radiators, vents, or air conditioning units.
If your home has built-in wardrobes, alcoves, or niches, measure their full dimensions and mark their position. These features can become valuable assets in your design — if accounted for early in the planning.
Super Tip — Lifehack for Ergonomic Renovation
Walk through your apartment one more time, this time focusing on ergonomics and how you actually use the space daily. Are you forced to bend awkwardly over the sink every morning while brushing your teeth? Mark this on your plan — it’s a sign that the sink height or cabinet setup may need adjusting for your comfort. Do you have to stand on your tiptoes every time you reach the top shelf of a cabinet? Write it down too! These small but crucial insights help you design a home that’s not just beautiful, but genuinely comfortable and tailored to your lifestyle.
Final Thoughts
Taking the time to measure your apartment thoroughly before starting any renovation pays off significantly. It ensures that your design ideas translate perfectly into reality, reduces surprises, and keeps your project on track and budget. Whether you’re working with a professional designer or tackling the project yourself, detailed measurements form the blueprint for success.
Remember — precision today means smooth sailing tomorrow.
Essential Tools for Measuring Your Apartment
Here’s everything you need, collected in a neat, detailed list with practical tips, usage notes, and rental options:
1. Measuring Tape (5–10 meters)
- Must-have? Yes — essential and irreplaceable for basic measuring.
- Why: Ideal for short distances (under 10 meters), corners, or curved surfaces.
- How to use: Pull out the metal tape, anchor one end against the wall or floor, and read the length at the tape’s edge. Lock the tape to keep it steady.
- Rental/price: Usually not rented — easier and cheaper to buy. Costs from €5–€20 at most hardware or DIY stores (Leroy Merlin, Bauhaus, Home Depot).
- Pro tip: Choose one with a solid metal edge and clear markings. Avoid fabric tapes — they stretch and distort.
2. Laser Distance Meter
- Must-have? Highly recommended, especially for large rooms and high ceilings.
- Why: Measures long distances (up to 100 m) instantly and with pinpoint accuracy. Ideal for checking diagonals, ceiling heights, and wall lengths.
- Advantages over tape: – One-person use — no need for someone to hold the other end – Super fast — gets measurements in seconds – Accurate — precision often up to ±1.5 mm – Calculates area/volume automatically
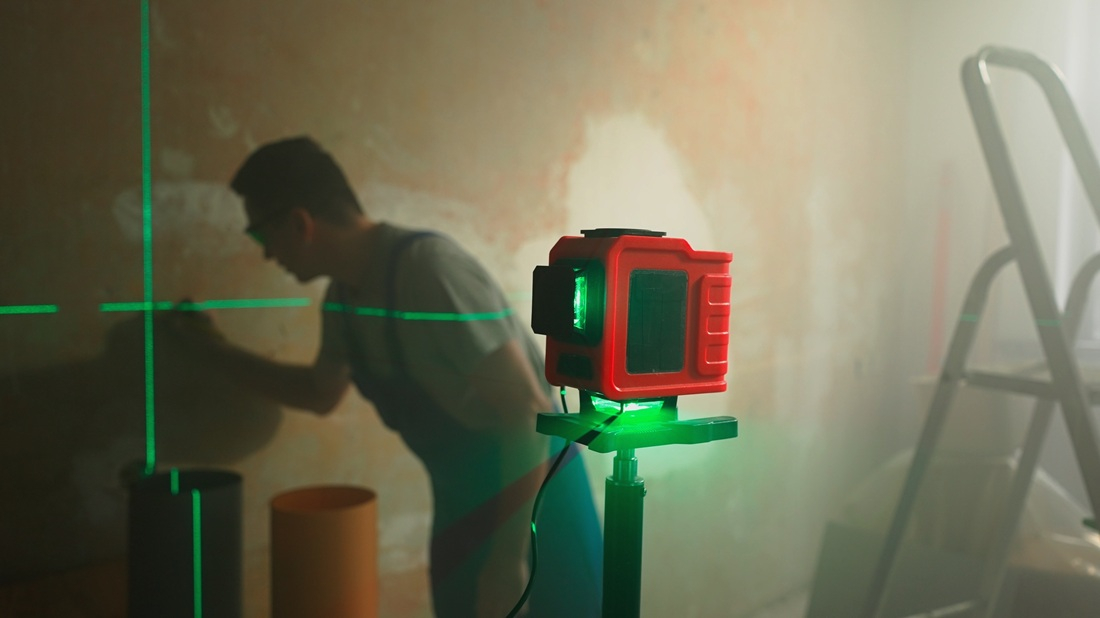
- How to use: Point the laser at a target surface (wall, corner), press the button, and read the result on the screen. Some models store multiple results and even draw simple plans.
- Rental/price: Available for rent at tool rental shops (Boels, Kiloutou, Toolstation) for €8–€15/day. Purchase price: €40–€120 depending on brand and features (Bosch, Leica, Stanley).
- Worth it? Definitely, if you're measuring an entire apartment or more than one room.
3. Spirit Level (Bubble Level)
- Must-have? Helpful, but not essential unless you're dealing with sloped floors or tiling.
- Why: Allows you to check whether walls, floors, or furniture are level and straight.
- How to use: Place it on a surface — the air bubble should sit exactly between the marked lines.
- Rental/price: Very inexpensive — around €5–€10 to buy. Usually not worth renting.
- Skip it? Yes, if you're not dealing with sloped ceilings or uneven floors.
4. Notebook and Pencil
- Must-have? Yes — essential for organizing and recording your measurements.
- Why: Keeps things clear and prevents mix-ups. Use separate pages per room and sketch layouts.
- Pro tip: Number each measurement and match it with arrows on your sketch to avoid confusion later.
5. Smartphone
- Must-have? Absolutely.
- Why: Photos capture tricky areas and details you may forget later — like plumbing behind the washing machine or awkward corners.
- How to use: Take wide shots of entire walls and close-ups of problem zones. Use markup tools to draw arrows or measurements directly on the photos.
- Rental/price: Your smartphone is enough — no need to rent anything extra.
- Bonus: Remplanner is a digital planning tool which runs fully online and can be used from any device, stationary or portable, making measurement and planning process more convenient.
6. Step Stool or Ladder (1–2 steps)
- Must-have? Only if your ceilings are over 2.7 meters or you need access to top corners.
- Why: Helps measure ceiling height or reach upper shelves and window frames safely.
- Rental/price: Can be rented for around €3–€5/day at home improvement stores or tool rental shops. Also available for purchase from €15 and up.
- Skip it? If you’re tall and your apartment has standard ceilings, you may manage without it.
7. Printed Blueprint or Floor Plan (if available)
- Must-have? Not essential, but helpful for cross-checking and making accurate sketches.
- Why: Gives you a reference for wall positioning and overall structure.
- Where to get it: Contact your building's developer, HOA, or municipal archives.
 Antonella
Marconi